
Knowing how to change the oil in your dirt bike is a basic skill but also one of the most important. Keeping your XR well maintained will mean it will go on forever and if the only thing you did do was the oil then you are half way there.
The oil capacity for a Honda XR250 is 1.3 litres
Why Is Changing The Oil So Important
Changing the oil is important to keep the engine in good working order. The job of the oil is to lubricate moving parts as well as absorb some of the heat that is produced.
All the time the engine is in use, oil is being moved around to lubricate. The oil will break down over time and the darker the oil the older it is.
Black oil means it is well overdue and should be changed straight away. It is generally the heat that causes the oil to discolure and blacken. This combined with carbon that is built up as a result of the oil getting hot and changin state.
I have seen some people say that keeping a clean air filter is essential to maintaining oil but this is incorrect. A healthy air filter will keep you bike healthy in the sense that it wont choke the carb if air but it wouldn’t allow dirt to get through into the oil.
How Often Should You Change Dirt Bike Oil?
Every 5 – 10 hours of riding is a great rule of thumb but it will depend on your style of riding. If you are pushing the bike to the limits the entire time you are in the saddle then you are will want to stick to this, or perhaps do it even sooner.
Pro riders may change their oil every meeting, or every other which could be the equivalent to every 2 hours of riding.
For me I mainly use my XR250 on the road nowadays and it doesnt have a hard life, so I can be more relaxed about the frequency I do an oil change. Although I still keep it maintained with regular checks to see how it is doing and changing it every 2 months otherwise.
All dirt bikes will have a guide in the owners manual and that should be your starting point if you are unsure. It will tell you the freqency as well as the type and quantity of oil.
What Type Of Oil Should You Use
For the XR250 I own the oil type recommended by Honda as per the manual states :
SAE 20W-50 / 10W-40
10W-40 is a good bet if you are unable to get the info from a manual because this is the most common type of oil used in dirt bikes.
I was curious about what the numbers meant so I looked it up quickly. They refer to the viscosity of the oil. And if you are like me, your next question is what does viscosity mean?
Viscosity means thickness/stickyness and how fluid the luquid is. So another way of putting it is the ‘weight’ of the oil.
The ‘W’ stands for winter. The lower the number before the W, the thinner the oil and the better it will start in colder temps.
The number after the ‘W’ relates to weight of the oil when it is operating at normal temp.
What About Oil Filters?

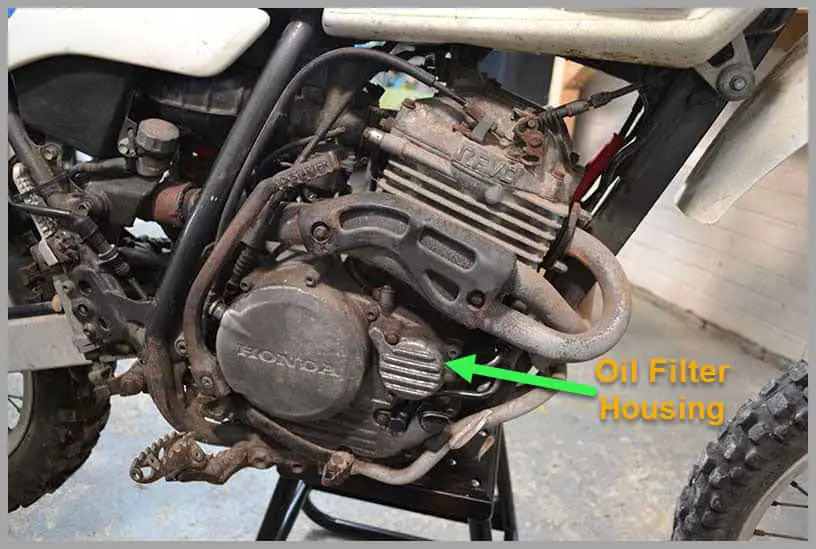
The oil filter is something else that should be changed and do it at the same time you do the oil. Easy to do and cheap to buy you may as well do it at the same time then you know its good.
There are quite few different brands of oil filter and I wont make a huge difference as to which one you go for. I have had Tusk, HiFlo, and k&N to name a few.
Oil Change: Items & Tools Required
- Spanner or socket for sump nut
- container to catch old oil
- latex gloves if you want – I do.
- funnel
- rag
- measuring container / jug
- Dirt Bike Oil – check your manual to find out the type and quantity
Quick Oil Change Guide
Step 1 – Warm up the oil by starting the bike
Go ahead and kick the bike over and leave it running for 5 mins so the oil has a chance to heat up a bit. As the oil heats it will thin which will make like easier when draining the oil.
Step 2 – Remove the Oil Refil Cap
A simple step but worth doing. When the cap is removed you are allowing a place for air to enter as the oil drains which will give the oil the best chance of flowing out nice and easily. If left on when the oil drains you are basically causing a vacuum and it will cause the oil slow. You can still drain it as the air would get sucked in through the sump hole that the oil is coming out of.
Just think if you took the lid off of a bottle of water and held it uuside down straight away, the water would escape but you get a glugging effect. Compare this to pouring the water out in a steady fashion where air is allowed to enter the bottle through th top half of the hole as water escapes through the bottom.
Step 3 – Balance The Bike Upright
Now is a good time to make sure the bike is upright and not on the stand. This allows the oil to drain fully because when on the stand the bike will naturally be lent over.
I usually do this in my garage and position the bike up against a wall where it isn’t going to get knocked by anyone coming through.
Step 4 – Remove The Sump Bolt And Catch The Used Oil
Latex gloves optional at this point. Personally I prefer to use them from the off. Using your spanner or socket, slowly undo the nut and as you do oil will start to drain so make sure you have your catching tray/container already underneath. It’s worth noting that some bike have 2 nuts so if this is the case make sure you take both out.
The sump nut will likely have a washer with it so just be aware of that if you drop it into the tray.
Step 5 – Give It Time To Drain
Having a little patience is good at this stage. I like to leave the bike for half and hour and have a brew or get on with something else whilst this is happening. Give the oil and good chance to fully drain.
Step 6 – Change The Oil Filter
At this point when the oil has been removed it is time to change your oil filter. Take care to go gently, you may undo the cover and find it is stuck so try and remove it by hand. It will just be suction or the fact it has been sat nice and snug for some time. Avoid using tools such as a hammer, or tryin to prise it off as you will probably just end up damaging something.
When the cover is off get your finger in there and pull out the old filter. A spring will probably be inside also which will need to be returned when adding the new filter. Possibly a wire mesh as well.
With all the parts carefully out put back together with the new filter in reverse order.
I like to take time to clean all components with a rag and cleaner if required.
Step 7 – Replace Sump Nuts
You should have drained the oil, replaced the filter and put back the filter cover. Now you need to screw the sump nuts back in.
You do not want to over tighten these. I screw them in by hand as far as possible then slightly nip them with my socket, and I mean very slightly.
Dont forget you should have a washer in between the nut and case.
Step 8 – Add The New Engine Oil
Using your measuring jug, add the amount of oil as stated in you owners manual. You do not want to under or over fill the bike.
Step 9 – Clean Up & Dispose Of Old Oil
Knowing what to do with your old oil is important. For me, I’m in the UK and we can take ours to the local tip where they have an oil disposal service.
You should be responsible and make sure you dispose of it in the correct manor in accordance to your local advice. Putting in your general waste isn’t acceptable.
Ensure your work area is clean and free from oil spills.
That concludes the quick oil change guide 🙂
How To Clean Up Split Engine Oil
At some point you will probably spill the oil on your garage floor. For me I always remeber in the early days, doing an oil change and thinking that the container underneath the bike would be big enough to catch all the old oil, only to realise that it was filling a little to quickly for my liking and was soon over flowing.
Clean up split engine oil by adding handfuls of sawdust over and around the spill, adding enough to absorb the oil. Then simply sweep up the moist sawdust . Add a further round of sawdust and leave for a couple of hours to absorb any excess then resweep to leave a clean surface.