Let’s be honest, cleaning is not the most glamourous part of riding any dirt bike but it is essential to keeping a well maintained bike and the exhaust is likely going to be the part that gets the least attention when you do decide to clean the bike, which should be after every ride by the way ;-).
Steps to cleaning your dirt bike exhaust pipe:
- Ensure exhaust is cool enough to touch
- Remove exhaust system from the bike
- Wash Exhaust to remove dirt and mud
- Use scotch pad / wire wool with degreaser
- Use WD40 where required
- Spray exhuast black (optional step)
- Re-assemble and mount exhaust back on dirt bike
Step 1 – Ensure the exhaust is cool enough to touch
The reason I have put this as a step, even though it is obvious to most, is that most people will want to go ahead and clean their exhaust straight after a ride. That is fine, and cleaning it towards the end of the process is maybe the best idea.
I know your not stupid but for safety just make sure it is cool enough to touch. We don’t want any unnecessary burns.
Step 2 – Remove the exhaust system from the bike
Some people will be happy giving the exhaust a clean whilst it is still on the bike, and that is your call, but that is why in the title of this post it says ‘the proper way’ and that is because you are not going to get it 100% clean if you do.
I am happy to admit that I do not take my exhaust off everytime I clean my bike…..that would be ridiculous, but I do decide to do it every now and again and/or depending on the ride I have had. It’s your call.
For this step then, you are going to need a few tools to hand. Fixings will vary on different bikes but for the most part you are going to need a t-bar set or sockets and maybe spanners.
I have a set like this which comes in handy for plenty of jobs on the bike.
The exhaust should be pretty obvious as to how and where it is attached so go ahead and I like to work from the header end back towards the tail.
If you haven’t taken these bolts out for sometime (or maybe never!) some of them may well be stuck. If you get one of these then give it a good coating of WD40 and move on to the noext whilst it is workig its magic.
It is unlikely you will get much of a problem wioth stuck bolts but pay particular attention to the bolts holding in the header pipe and you realy dont want them snapping. Take you time, make sure you are using the correct tools, not a pair of pliers or adjustables because you have misplaced your t-bars.
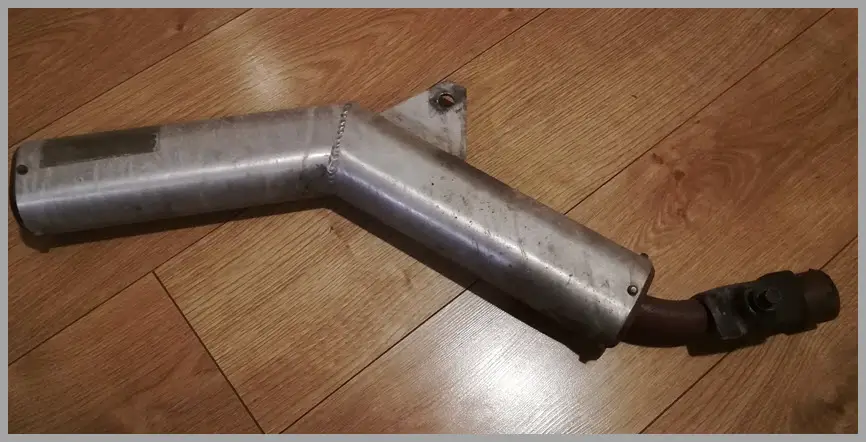
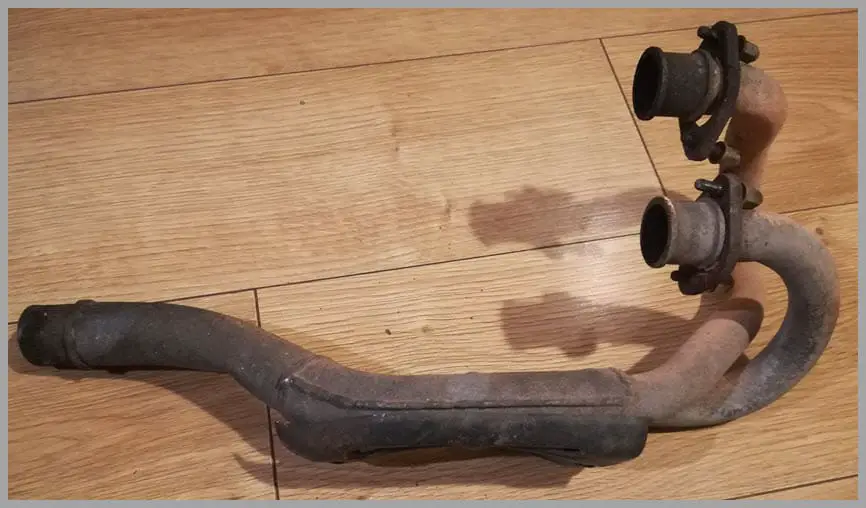
All being well you should have the exhaust off of the bike and if its like mine it will be in 2 sections, the header and the silencer.
Step 3 – Bath Time – First Wash
For this I like to use warm water in a bucket with a stiff bristle brush. The best brush I have found to use is a nail brush as it gives you good control over pressure and direction. I also prefer to do this outside, if you are doing it inside then it might be best to do it in the sink itself.
Using the brush, go over both section of the exhaust to remove mud and debris. I’m not shy about submerging the pipes if needs be and this will help shift some if the looser carbon build up from inside the pipe.
Just be careful with any carbon as it will easily stain and can be a bitch to get off clothing.
Step 4 – Scrub and Degrease the pipes
Next up it is time to bring in the elbow grease. I like to use scotch pads, you know the green pads that you use for washing up and sometimes wire wool. Another handy tool can be a wire brush depending on what condition your exhaust pipes are in.
The wire brush is best on rustier type pipes not ideal for newer pipes that may well still be in great condition. For example below is a pic of my header pipe from my xr250 before any work for the rebuild. Using a wire brush on this is fine and is great for surface rust areas although I didnt actually have to much on this pipe.
So using a degreaser and scotch pad you need to scrub as best you can the whole pipe. The aim here is to make it as smooth as possible. The more work you put in at this stage the better it will looks, especially if you chose to spray paint it black to finish.
It is worth mentioning that on the header you will have a heat guard which may or may not be able to be removed. Remove it if you can, if not then do your best to get in behind it.
On you muffler you will likely have a different type of metal. That is one such as polished steel which is normally wrapped over to give it a finish. You do not want to scratch this up if you can help it so using a cloth and degreaser to start with in a hope that you can get it clean rather then going in with the pad. Definitley dont want to use wire wool or the wire brush on this part.
Step 5 – WD40 Is Your Friend
With the header pipes and muffler cleaned up you may well be happy with the result and if you have finished without painting it then you will want to give it a good coating of WD40 which can be sprayed and wiped over.
Try and give it a complete covering. WD40 is a form of oil that will give the surface a protective layer against moisture and oxygen which would cause the rust to take hold.
Whilst you are there, take the opportunity to spray any nuts and bolts.
Step 6 – Spraying Your Exhaust Black
Most people would want to try and return the look to a nice black finish and it is easy to achieve a good look with the low cost method of sray painting the exhaust.
After you have cleaned it and without having used WD40 on it you are ready to spray the paint directly onto the pipes.
First off though mask off any areas that you do not want to spray. These are potentially the brackets that fix the header to the engine, the stainless on the rear exhaust pipe and any other areas on your system.
It is also a good idea to block the openings with tissue paper or newspaper to prevent spraying inside.
When spraying the piece you can get good all round access by hanging it up using a wire coat hanger and going through a bracket whole or some other fixing that will enable the pipe to hang freely.
Once hung you will be able to get a nice even coat all the way around. Try and do nice even, long sprays at 1-2cm away from the pipe.
When choosing a spray paint it is important to use heat resistant paint the will be able to with stand the heat generated from the exhaust, otherwise it will just peel away.
You will likely find black spray paints marketed towards exhaust so you know it will be fit for purpose.
Step 7 – Re-assemble and mount exhaust back on dirt bike
That’s it, you should be good to fit it back on your bike. Whilst doing this you can check the gasket that goes between the header pipe and the engine to see if it needs replacing.
I also like to grease the bolts to make sure they are well maintained and means they will be easy to get out next time.
Cleaning Carbon From Inside The Exhaust
Carbon builds up on the inside of your bike exhaust just as it would in a car. The carbon build up is caused from the small particles of carbon dioxide fusing together under heat.
To clean this carbon build up out of the exhaust you can use a couple of different methods if you are looking to do it yourself. You can on the other hand take it to a garage and ask them to do it.
The main method most people use is heat, and this can be applied in a couple of ways. The way I do mine is by laying the exhaust over a fire pit because thats what I have handy at home. Other use a bbq and light the grill and use that.
So assuming you are using a small fire of some description, you will firdt want to get the fire going well. For this I use logs and wait for them to really get going.
When the fire has become established I put my pipes into the flames and leave to get hot. The hotter the better as long as you are not going to bend the exhaust which is possible if they get hot and then you drop them onto a hard surface. Not liekly I know but worth mentioning.
When they are roasting hot blow some air through the pipes. This will feed the fire which shuold be inside the pipes. This is the carbon on fire. I use a hair dryer for this and ensure the exit is well clear of anyone or anything.
Work the pipe through the fire so all of it has had chance to get hot and blown with air. This will cause the carbon to burn out.
Once you are happy, remove the pipe from the fire using something to protect your hands (oven gloves work well) and after it has cooled a little I take a hammer and tap the pipe whilst holding it vertical giving a chance for any carbon to drop out the bottom.
Tap the pipe from top to bottom and if required return to the heat and repeat the steps.
I did find a short video on YouTube which does illustrate what I have just explained. Here it is..
Another weay to heat the pipe is using a blow torch and heating different sections of the exhaust pipe as you go. After heating a section turn to sending heat through the pipe to burn off the carbon. This will have the same effect as the hair dryer approach and maybe better. I dont do this as I dont have a welding torch.
Different Parts Of The Exhaust
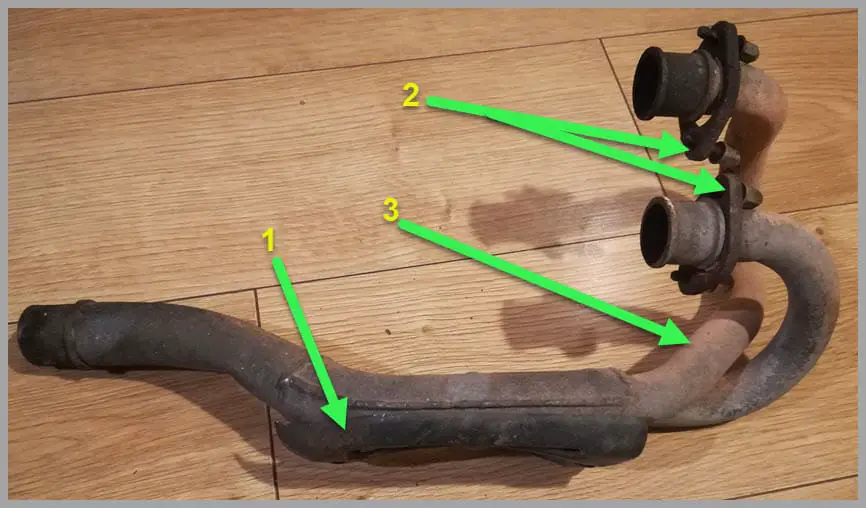

- The exhaust isn’t in the best position to see this in the pic but this is the heat guard.
- These brackets are what screw this header pipe into the engine. They are worth being careful with if they are stuck, and take your time to get them out so they dont break.
- This is pointing to the pipe itself and this pipe is called the header pipe.
- The end of the exhaust, known as the tail pipe by some people, muffler or silencer. Inside this it is packed with a material that helps to silence the sound. Sometimes it can blow out and will need repacking if it does. If it is blown out it will also cause loss of power.
- This is the part of the pipe that connects the muffler to the header pipe.