My recent purchase has been the Honda XRL200 which is a japanese import, built in 1993 and registered here in the UK in 1997. Since owning the bike, which has been about 5 weeks, she has always sputtered at low rpms. Now it’s time to fix it.
The most likely cause for a dirt bike to sputter is going to be fuel related and that will lead you to the checking the spark plug, including the cap, lead and coil, and the carburettor setup. It could be blocked jets, incorrect settings, or the air screw. Making sure everything is functioning as it should and that it is clean.
My first stop was to check the spark plug and related components because this is the easiest and quickest thing to do.
Check The Spark Plug, Cap, Lead and Coil.
The Spark Plug:

Take out the spark plug and first do a visual check. Is the end of the plug excessively wet or dry. This could mean that there is too much or to little fuel getting through which would direct us to the carb.
Also check to see if the white porcelain is cracked or damaged.
Check to see if the plug creates a spark. Do this by leaving the spark plug in the cap and holding the exposed end of the plug against an unpainted surface on the bike. Most people would use a bolt on the cylinder head.
Go to start the bike and check to see the plug is creating a healthy spark.
Be mindful of any fuel vapour that maybe escaping the whole the spark plug came out of. This maybe the case if the plug was wet and you don’t want an emgine fire.
The Spark Plug Cap:
Next is the cap, it worth checking this even if you are replacing the spark plug as the problem. They are easy to test and cheap to replace if needed.
The cap is connected to a HT lead. You will be able simply twist and pull it off using an unscrewing motion.
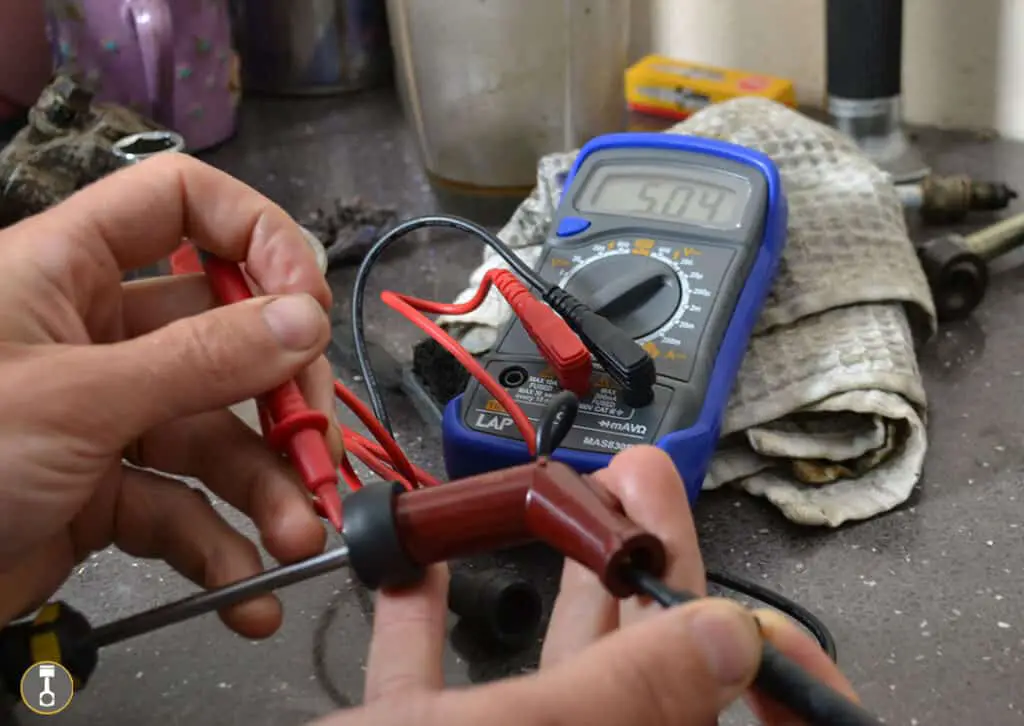
Test the cap using a multimeter. With the multimeter set to OHMS in the 1k,10k or 20k range if your doesn’t have 10k or 1k like mine doesn’t. Place one probe in each end of the plug and hold it there to get a reading.
Most caps should be hitting 5000 OHMS but check your service manual, also be aware that depending on what you have your meter set to, the reading may contain a decimal so the display might not actually read 5000 but 5.000
If the spark plug cap is a deep one and you can’t get the probe to touch the spot then you can use a screw driver to extend your reach and it won’t effect the multimeter reading.
The HT Lead:
The ht lead is a basic component that is best tested with the coil as one unit. The main thing I do with the lead on it’s own is when you have the cap off you can check the end of the lead visually.
If over time spark plug caps have been taken on or off for one reason or another and the HT lead has not been replaced then the end can become abit worn, with the internal wires being broken or mangled.
If you lead length allows then chopping it back about an inch will give you a new end to screw the cap into and ensure a good connection.
The Coil:
The coil sits at the opposite end of the ht lead to the spark plug cap and you will need to take it off to test it.
Using a multimeter again, test the coil for resistance. This short video shows you better than I can explain it so take a look.
Check The Fuel System
There is a high chance that your sputtering dirt bike issue is fuel related so I start with a couple basic things then end up on the carb.
Is Fuel Getting Through?
It doesn’t get much more basic than this. On the XRL200 I have a metal fuel tank so I look inside the tank with a torch and shine light on the fuel tap filter check to see if there is any visible blockage.

This could come from rust forming in the tank or just other dirt and debris. It may sound very basic but worth checking and a logical place to start. Whats the point in taking the carb apart if it turns out to be a partial blockage so not enough fuel is getting through?
Another thing you can do is pop the fuel pipe off of the petcock (fuel tap) and turn the fuel on to see it is coming through that way. Obviously have a container on hand to catch the fuel.
My next stop is the fuel drain screw on the carb. Using a screw driver to undo this screw will allow fuel to run out of the attached pipe. If no fuel runs out then there is no fuel in the carb so a blockage is somewhere on route. Possibly in a pipe but could also be a dirty carb.
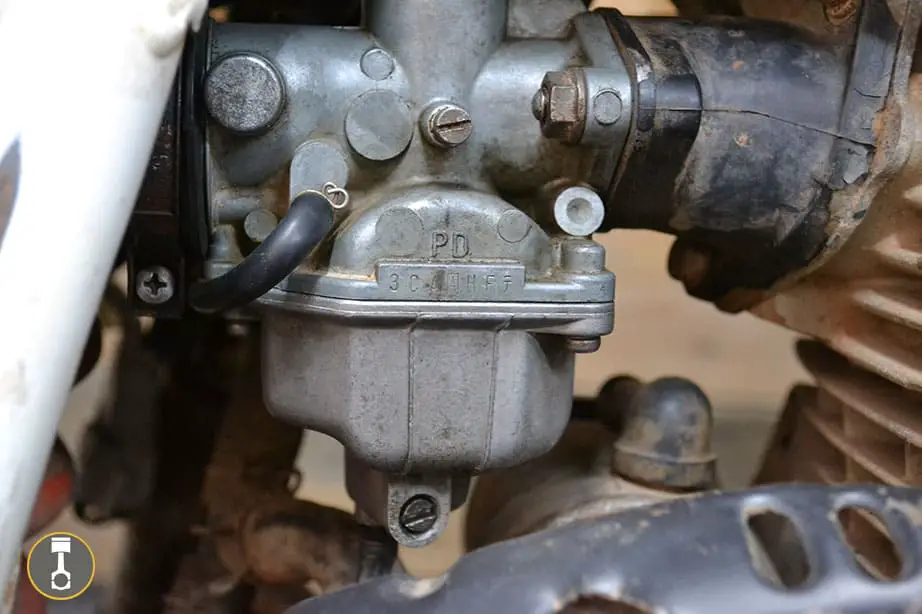
Checking The Carburetor
Most sputtering issues can be linked back to the carb. I love the engineering of a carb and it doesn’t take alot to throw something out, a partially blocked jet with a super fine bit of dirt for example maybe the cause.
Upon taking the carb off and then apart, I check the jets. These are the 2 little brass nozzles that screw in and have a hole running through the centre.
Jet Size:
First we want to make sure that the right sized jets are being used in the carb. Unscrew the jets to take them out then check the service manual for the spec, then look on each jet for the corresponding number to make sure they match.
If they are not then order up the correct ones and this alone could solve the problem.
Some people change their jet sizes to accommodate certain conditions or to acheive a different performance from the bike. That is fine if you know what are doing but we need to eliminate this as an issue and we know the service manual spec will do this.
You can always play around with jet sizes after the problem is fixed.
Blocked Jets:
If they are the correct size then you will want to check them for blockages. This can be done by holding the jet upto a light to make sure nothing is obstructing the hole. Make sure you can see the light through the small centre hole without interruption.
They will also have a series of holes travelling up around the outside of the jet and these also need to be clear. Use the same method to check you can see light with no obstructions.
If you do find a blockage then you can use a pin from the wifes sewing box and this should fit into all holes. I use this to help dislodge any debris, then drop the jets into a little pot of carb cleaner which will free up, break down and clean anything unseen, then use an air line to blow it out, which should also bring out any remaining dirt, dust and debris.
Once clean and satisfactory reinstall the jets into the same holes they came out of. You will notice that one jet is bigger than the other. The larger of the 2 is the main jet and the smaller is the pilot jet.
The Air Screw Settings
The air screw is a single screw that controls the amount of air you allow in. When setting this you would install the screw and wind it all the way in, then as per the settings in your service manual you wind it out to the correct amount of turns. The setting dictates how much air can pass the screw and the more out the screw is turned the more air passes.
For example stock settings may say that the screw needs to be out 1 & 3/4 turns.
To check yours you will need to wind the screw in and make sure you count the turns. Start off with full turns. So with your screw driver on the screw do one complete turn and count ‘1’. Next go for a complete second turn. At some point the screw would of been fully in and you may of managed 2 whole turns then a half turn on the third rotation. This means it was set to 2.5 turns out.
How does that figure compare to the service manual. If it’s not the same then go with the service manual.
Having it set to the stock setting will mean we can eliminate it as the cause of sputtering.
Float and Needle:
The float in the carb rises as the carb fills with fuel. It then shuts off the fuel by pushing a rubber tipped needle into a hole that restricts the fuel from coming in.
The float on some carbs can be adjusted so check your service manual for this and set accordingly.
Also check the float needle by removing, inspecting and cleaning.
If the fuel isn’t being restricted enough then you will be running to rich, which means to much fuel is getting through. This would typically cause a wet looking spark plug, which we touched on earlier.
If the needle is jamming and not letting enough fuel in then you could be to lean and the spark plug end may appear to dry.
So check the tip for damage or wear.
Checking Your Air Filter
Another easy thing to do it to check the air filter condition. The bike intakes air through the filter and if this is restrcited it can be an issue.
Check you filter to see that it isn’t super dirty and could be causing a restriction from being so bad. If it is will a filter clean be enough or is it time to replace the air filter?
Sometimes the filter may be to saturated in oil from who ever installed it. This can also be a cause for not enough air getting through.
Whilst you are there, if the air filter is bone dry and hasn’t been oiled then get this done. I will be writting a post soon about oiling your air filter and can be found be searching my ‘Dirt Bike Maintenance Hub‘ page.
Is Your Dirt Bike Sputtering At Low RPMs?
If you carb is starved of fuel it will cause sputtering because it is effectively running out of fuel. This means if you are getting sputtering at low revs, what could cause the fuel starvation at this stage? The answer could be the pilot jet also called the idle jet or slow jet.
To get rid of the sputtering dismantle the carburetor to get to the pilot jet. This is the smaller of the two jets, the larger is the main jet. Unscrew, hold upto a light to check for any noticable obstructions through the centre and surrounding holes. Clean with carb cleaner and blow out with an air line then replace.
You should also clean the rest of the carb out whilst you are there so the problem doesn’t repeat.
Fuel left in the carb when the bike isn’t in use for a period of time will crystallise and that can break away and cause clogging.
Is Your Dirt Bike Sputtering At Full Throttle
In contrast to sputtering at the lower end, you may be getting it when you are at full throttle, and when bad it can cause the enigine to cut out. Again this typically leads us to a fuel related issue but not always.
Check your carb is clean and the jets are not blocked and check the float and needle. If the problem isn’t fuel it will be related to the spark plug, cap, coil or stator so move on to check these also.
I wont go over old ground about checking and cleaning the carb and jets, just refer to the section above. We have also spoke about checking the spark plug and related parts.
Sputtering Conclusion
Hopefully this post has helped cure your dirt bike from sputtering and you were able to fix it without to much trouble.
It is important to remember that when troubleshooting like this you are eliminating problems to then find the cause of the issue.
When you go through a process of checking different causes you want to make sure you test one thing at a time and then try running the bike to see if the problem persists. This way you will narrow down the possible contenders until you find the fault. Doing it like this will give you the knowledge that you know certain parts are good and working or not, and if the problem returns you can check what was faulty first to see if it has reoccured.
I will file this post in the ‘troubleshooting dirt bikes‘ category which is a great place to search if you are having other problems with your dirt bike.