

The time has come to restore the forks on my Honda XR250 which I am doing as part of a dirt bike project which involves completely stripping it down a rebuilding the entire bike. If you are interested in following along the whole project then check out the XR250 hub page.
Rebuilding forks is new to me and in this post i’ll talk you through what I did, how it went and what I found out along the way. All in all it is fairly easy once you get stuck in so dont be scared to give it a go.
This is a run down of how I went about rebuilding my XR forks.
- Remove the forks from the bike frame.
- Disassemble forks one at a time.
- Check for damage, wear and tear and order and required parts
- Clean fork components
- Assemble forks including any new parts
- Add new fork oil
- Mount rebuilt forks onto the bike frame
Following on we will look at each stage of the build and I shall include where I bought parts from and the overall cost of rebuilding the forks to try and give you a good idea of what you might expect if you are doing your own.
Tools – Here Is The List I Used:
Depending on your forks you may need slightly different tools but in the main it will just be different sizes of the tools I used.
The good thing is, I didn’t have to buy any additional tools to do the forks so hopefully you have what you need already.
- Socket and Ratchet – sizes 22mm and 10mm
- Utility Knife (you probably wouldn’t need)
- Rubber Mallet
- Screw Driver with adaptable bits – used small flat head and small philips
- Adjustable Wrench
- Allen Bolt T Bar – 10mm
- Blue Roll
- Bench Grinder
- Bike stand
- WD40
- Fuel – used for cleaning parts
- Small wire brush set for cleaning
- Seal driver – mine is homemade and easy to do.


Assuming you have a socket set as most ‘tinkerers’ will, you will have the different sizes available in the set. My large nut on top of the fork was 22mm and I had the air valve sat in the middle of it which took a 10mm.
The only other bolts that needed the socket were 4 x 10mm bolts holding on the bracket for the speedo cable.
The allen bar is used for the bolt in the bottom of the forks and I think most are allen bolts so likely hood is your will be a size 10mm also.
I used my adjustable wrench for one fixing and that was because I couldn’t find a correct sized spanner even though i know I have one somewhere…so I am unsure as to what size it was but if you have a spanner set then this would be the easier option.
My reason for the lump hammer was to encourage the large top nut. I just couldn’t get it to crack by hand and this is common scenario so having one on standby is a god shout.
The screwdriver was used on the oil drain screw although many forks have a nut instead. The opther thing I used the driver for was to pry up the snap ring that holds the fork seals in place but we will come to that later.
The bench grinder may not available to everyone I know but they are a great investment if you find yourself working on your bike anymore than just general maintenance. For this job I used it to clean up various parts, using the wire wheel followed by the buffing disc. It makes light work of things which otherwise would need doing by hand.
You probably wont need the utility knife. The purpose of using for me was to cut cable ties that held on the fork boots, that should be held on by a clip if proper.
Getting Started: Removing Forks
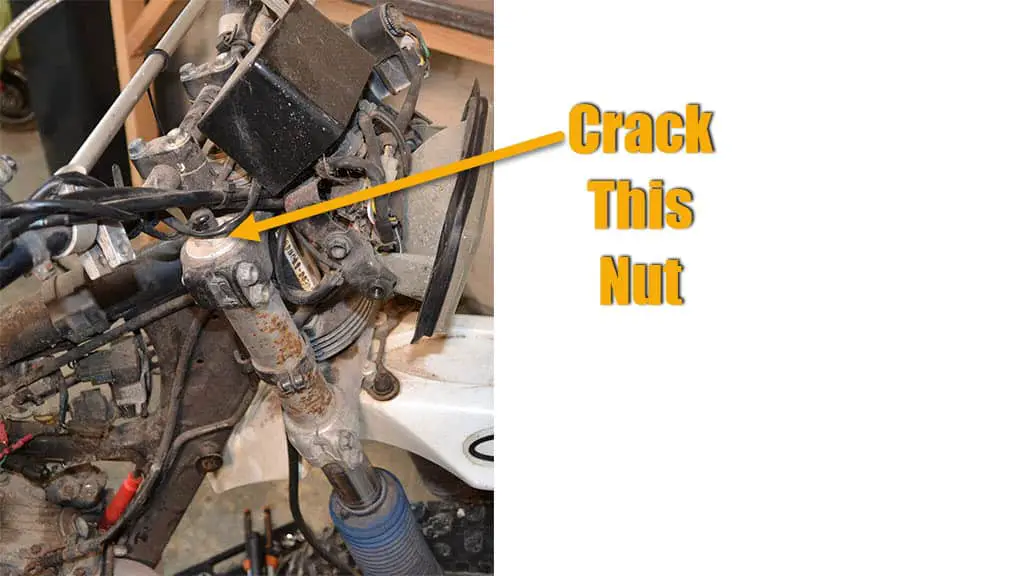
Top Tip: Crack The Cap Bolts Whilst The Forks Are Still On The Bike
That tip is going to save you a ton of hassle, believe me…I know. The problem I found is I had stripped the bike down because im doing a complete rebuild of this XR as part of a project and that obviously included taking the forks off.
As this is my first ever venture into dirt bike mechanics I had no clue and suspect this wont be the first error… but hey at least you guys know and i’ll know for next time.
If you do need to do it the hard way then I would advise taking each fork one at a time and putting it back in the tripple clamp. Take the clamped fork and rest the clamp on your bike stool. Place your foot on the clamp and use your body weight to keep it in place whilst you attempt to crack the nut with your 22mm socket. You should also make sure you have released any air pressure that has built up by using the valve centred in the middle of the nut.
This tripple clamp method worked for me twice and because I also don’t have a vice I also used the clamp to hold the fork upright when draining the oil as you will see in a moment.
Draining The Fork Oil:
Oil is used in the fork to absorb impact and is generally a 5w oil but can be a 10w or even a 15w if you are wanting a stiffer ride. Although you wouldn’t change fork oil as part of regular maintenance you would be changing it irrespective of a fork rebuild periodically throughout the bikes life. If you change the fork seals then replacing the oil at the same time makes sense whilst you have everything apart. This is what most people do.
You need to drain the oil before dismantling the forks otherwise you will have a big mess on your hands. On my XR forks this is done by a drain screw located at the base of the fork. Dont be surprised if yours is a bolt, it does the same job.

If you simply took the fork off the bike and undone the bolt without cracking that cap nut then the oil would slow to a drip very quickly. Cracking the nut allows air to enter and aids flow, so if your oil is draining really slowly or has stopped when you think more should be in there, then unscrew the cap nut fully and pull upwards to allow the air in.
Each fork will take approximatley 450ml – 500ml of oil to give you an idea of how much to expect when draining.
After I had started the draining process I left my fork for a short while to allow gravity to do it’s thing. The fork balanced on the edge of my workbench using the tripple clamp as I mentioned before, weighted with a 5L can of brake cleaner. This was hanging over a large bucket to catch the used oil.

To dispose of the used oil I funneled it into an empty veg oil bottle which I can then take to the local waste disposal plant. The bottle is a litre in size and contains oil from both forks.

You should be able to find the quantity of oil that your forks take by checking your manual, or if that fails maybe Google. For me I use my trusty Haynes manual and it tells me the forks take 16.6 Fl Oz which equates to 490ml. It will also tell you the type of oil including the brand. Mine states ‘Pro-Honda SS7 suspension fluid or equivalent’.
When the oil comes to a stop, hold the fork with one hand and pump it with the other to encourage any remaining oil to exit.
At this point I like to undo the bottom fork bolt and remove it. This is the bolt at the very end of the bottom of the fork and is often an allen bolt. Mine was a 10mm Allen Bolt and for this I used the allen t-bar.
This bolt can also be tough to crack but the tripple clamp wont help because the bottom of the fork rotates freely from the top. One of mine was a tough job so I rested the fork on my bike stand and stood on the lower half of it with one foot. I then used the rubber mallet to give it a short sharp wack and that done the job.
Again… A vice is probably the best tool for this if you have one and is on my list of tools to get.
Internally there is a damper rod that runs through the fork, it is the bottom end of that rod that the allen bolt screws into. It is worth noting that sometimes when trying to unscrew the allen bolt the rod rotates at the same time. Cracking it with the rubber mallet as I mentioned above can be enough to break the seal and allow for removal. You can also apply pressure to the top of the fork so the spring compresses and in turn puts enough pressure on the bottom of the rod to hold it in place . Other people like to use an impact gun which does the same sort of thing.
The allen bolt will be holding in a copper washer which may or may not come out with the bolt. Because my forks havent been touched for years, the copper washer stayed inplace in the base of the fork and I even doubted there was one in there to start with. The pic below shows the bolt and washer cleaned up after taking it apart. It was black.

Using a small flat head driver I was able to dislodge the washer. When it comes to rebuilding the forks, replacing this washer is the right way forward. Re-using the old one could mean an oil leak because it may not create a seal between the allen bolt and fork due to being misshappen. The function of copper washers is to mould into the fittings when pinched up and copper is used because it is a softer metal.
If you have a local fixings store then this is a good option for a replacement washer ‘cos they can match the size. If not then I got mine from eBay and took measurements for the internal and external diameter, as well as the thickness. Either way they are cheap to buy and a good item to have on stock so get a few extra whilst your there.
From now on after you have the bottom bolt out you will start gathering parts and fixings as you go through the rebuild process. It is a good idea to keep a track of what came from where and which fork it was from.
Taking pics along the way is also a good tip if you are unsure of how things go. The pics I have used for this blog post are just a small selection of the total I took in order to get some decent reference material for when I get stuck putting everything back together.
Dismantling Forks:
Begin by taking off the fork boot also called a gaiter. Mine are blue and initally I thought I would be replacing these but in the end I decided to clean them up and re-use them.
Mine is held on with cable ties from the previous installer but the norm is for them to be held on by gaiter clips. Simply take off the clips (or snip the ties) from the top and bottom of the gaiter and slide them and the fork boot off over the top of the forks. I’ll talk about cleaning everything later on.
Under the fork boots you will get a good idea of the condition of the fork seals and if they have likely been done in the recent past. I can tell you mine hadn’t because the snaps ring that holds the fork seals in was corroded in place.
Before tackling the seals I had the cap nut fully unscrewed from previously draining the oil. If you have taken the bottom bolt out then at this stage you will be able to pull the cap nut up and you will see it is attached to a rod which runs right through and the entire rod should lift out from the upper and lower fork tubes. Here is what it looks like.

You are now left with the upper and lower fork tube with the seals.
To take the seals out you first need to remove the snap ring that holds them in. You will need a small instrument for which a pick is ideal if you have one. For me I used the smallest flat head bit on my screw driver.

- lower ring
- seals – oil seal and dust seal stuck together, oil seal is at the bottom, dust seal on top
- top washer
- snap ring
You can see the snap ring at number 4 in the picture above and you will notice it isnt circular as word ‘ring’ might suggest. It has sections that are indented and the ring doesnt come to a close. The idea is it naturally wants to spring outwards which keeps it positioned.
With your small driver or pick, place it in one of the indents and pull the ring inwards which should close the gap at the end of the ring and allow you pull the ring out of the groove it sits in. If it isn’t corroded like this one then its simple.
Be super careful not to scratch or mark the top fork as it may be a cause for a future leak.
Once the snap ring is out there will be a washer to come off next and should be free moving so will just slide up the fork.
The rest of the assembly will come out by pulling the top and bottom forks apart. Do this with a short sharp pull and don’t be shy, it will take some force. It took me a about 5 goes before I ended up deciding the fork wasn’t going to get the better of me!
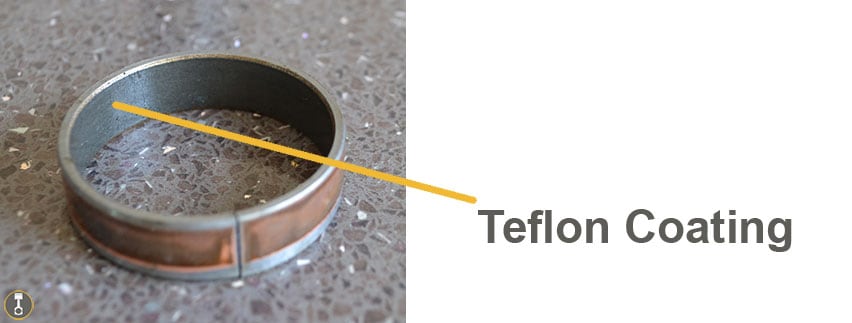
Coming out of the forks you will have everything in the picture above plus a bushing that will look like this.
So the order for putting them back together is
- Bushing Ring
- Bigger washer
- Oil Seal
- Dust Seal
- Smaller Washer
- Snap Ring
The bushing is coated on the inside with teflon. When you take it off you want inspect it to make sure the teflon coating is still present all the way around and not wearing thin. If you can see copper underneath it then it needs replacing. Also you don’t want any tears or scratches in it.
There will also be a bushing on the fork itself and the same applies with the teflon which on this bushing is coated on the outside.

With the forks seperated I turn my attention back to the damper rod we pulled out of the centre of the fork.
The rod is made up of the bottom cartridge, internal rod which has the springs around it, and the top nut cap.
The nut cap is what needs to come off and you need to hold the centre rod steady so you can get some leverage to unscrew it. For me, I achieved this by sitting the base of the cartridge on my bike stand. Placing one hand around the top of the spring, I pulled down to expose the top of the rod, which changes shape from the cylindrical rod into a threaded nut, but is all one piece. See pic below.

With a spanner on the exposed nut and one on the very top of the cap you can twist them to crack the top nut off. It will then unscrew by hand until it is completely off.
My spring is in 2 sections. A short top spring and a long bottom spring. One spring guide washer sits inbetween the springs and one sits on top the short spring . The one in the pic above can be seen suctioned onto the base of the cap nut.
Remove all of these elements and carefully inspect for signs of wear and tear and replace if needed. Mine where fine.
At this stage it is a good idea to hold the cartridge and piston over your bucket and pump it to expel any old oil that remains.
Cleaning the cap nut whilst it is off is a great idea. I also removed the centre gold coloured valve with a 10mm socket.
Cleaning Components Before Rebuilding:
So at this stage you should have just about everything dismantled from the forks. You may have the speedo cable bracket on fork and the brake cable bracket on the other fork still attached if you haven’t taken them off at some point put this wont effect the rebuild. I took mine off to give it a much needed clean.
I use a few different cleaning techniques and I’ll go through what I cleaned and how, in no particluar order.
Lower Fork Case:
First up its the bottom outcase of the fork. The piece the wheel axel slots into. The forks i’m running are as old as the bike, and this Honda XR250 is a 1991 model making it 29 years old at the time of writing. As you can imagine with that age the fork casings are going to of seen some action and I have quite a few heavy scratches in them.
Cleaning them is pretty straight foward. I used a small wire cleaning brush, the ones that look like big toothbrushes and dipped the head in fuel and ran them over the fork paying extra attention to any grooves and moulded area.
A good scrub got most grim off and for a couple of stubborn bits I introduced the fork to the wire wheel on the grinder which made light work of it.
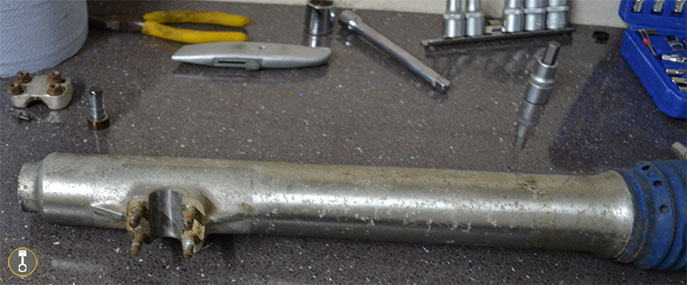
I finished off by just going over it with a rag although something I was going to try was metal polish to see how tat came out, but didn’t get round to it. When I do i’ll add a little update.
The top fork pipe:
The shiney part that the tripple clamps connect to. Basically my upper pipes here are in brilliant nick from the section below the tripple clamp and terrible condition above. You can see from the pic below that I have some serious rust and pitting in the upper part and there is no way of cleaning that back to life.
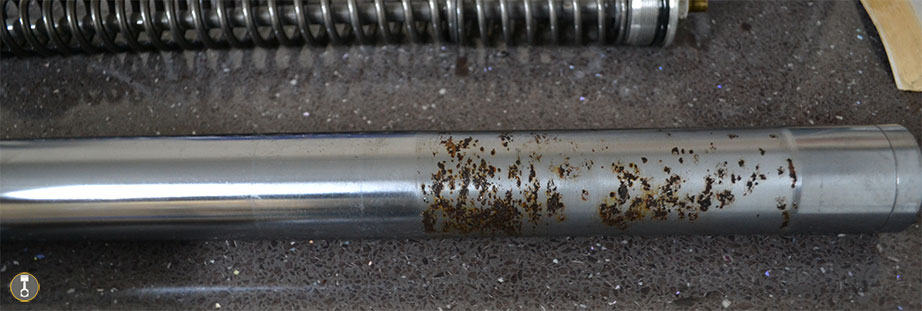
Before attempting to clean these I thought I was going to tackle them with a fine sand paper or wire wool and take a similar approach to how I restored the plastics (that post is here) but after I started it was evident that only the wire wheel was going to make a dent in this problem.
I liberally brushed on some fuel to help get things moving then took it to the wheel. I had to be verry careful to stay within the affected area because I didnt want to cause scratching to the shiny area as that travels down into fork and passes the seals. That could potentially cause serious issues and require seal replacement!
The wire wheel done a fair job and the pitting remains without the rust. I think I can get the pitting sorted by a professional company but at this stage Im looking to keep a handle on costs and as it wont effect proformance i’ll keep them as is. I’ll add some final result pics at the end of this post if you want to see how they came out.
The Damper Rod and Springs:
These were in good condition in both forks so I took them apart to inspect them, then wiped over and reassembled. The 2 items cleaned from them where the very top nut – cap nut, and the oil cap which the damper rod sits in.
All Fixings:
Here I mean nuts from wheel axel clamp, cap nut, seal washer rings, bushings, oil cap, there maybe one or two more things.
Where possible I soaked these in fuel and apply the no delicate parts, like bolts and axel clamp to the wire wheel to brush out the crub and bring them back to looking good.
Other items liek the oil cap soaked then wiped with a rag and the cap nut and such I used elbow grease and the softest wire brush to clean with a little fuel.

I love this part as you can restore some parts to look brand new and others to a much improved look.
Fork Boots (Gaitors):
In the first instance I thought I would simply chuck these and buy new, but then I thought why not see how they come up? so thats what I did.

They ended up not looking to bad, I mean you can tell they are used and old even but they are 10 times better than before. Again maybe something to buy in the future.
Buying Parts:
Now everything has been cleaned and looked at you can decide what parts you are going to replace. The seals are going to be a minimum if you have gone to the extent of rebuilding your forks and oil goes without saying.
Other items could likely be bushings, snap rings, washers etc.
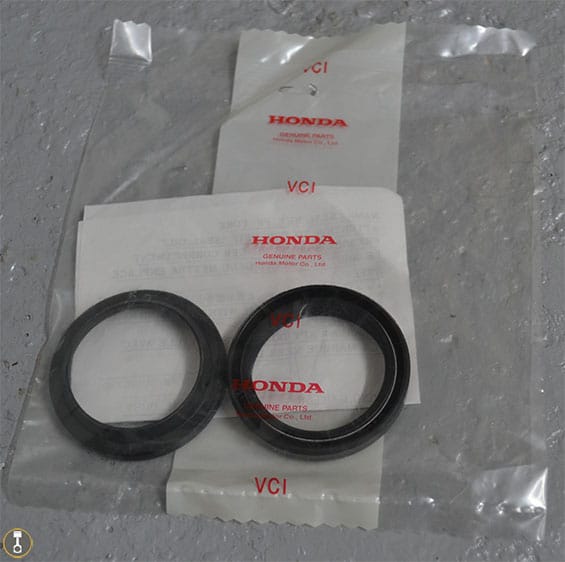
For this rebuild I purchased a new set of seals, copper washers for the bottom allen bolt and fork oil, all items for both forks.
The fork oil I got was Putoline HPX-R which is 5w and is good for most dirt bike forks. This one cost me £11.79 delivered and is a litre so is good for both forks. I have been told not to use fork oil that you have had lying around from a previous change. I dont know why or if that is true but just incase I would try and buy as close to the amount you are going to use as possible to eliminate that. I was left with 20ml

The copper washers I purchased from eBay because my local fixing shop is shut due to the pandemic. 10 washers cost £2.79 delivered and they fit perfect. I measured the internal diameter at 12mm, the external diameter at 18mm and thickness of 1.5mm and the listing had it labelled as an M12 Copper Washer incase that info comes in handy for you. I’m guessing this size is widely used for this but worth double checking.
The fork seals were bought from Fowlers Parts and you can find the parts page for the forks here – https://www.fowlersparts.co.uk/parts/5141877/xr250rm-1991-ed/front-fork-xr250rgrhrjrkrlrm
I bought item 31 which is the seal set and that means you get both the oil seal and dust seal. The set was £34.34 each of which I ordered 2 so £68.68.
Rebuilding The Forks:
Putting the forks back together I found to be the easiest part and its rewarding to see your efforts payoff.
I will try and describe this as clearly as possible by writing steps so hopefully it makes sense.
Before you start make sure you have all the components for one fork only on your work bench. Lay everything out, assuming you have the space, and try to put it in assembly order ( listed further down). As well as the parts you will need a few tools and items to hand.
- Fork Oil
- General purpose grease
- Paper towel / rag / cloth
- Small flat head driver or pick
- Seal driver (mine is homemade)
- Rubber Mallet
- Measuring Jug
- Socket / Adjustable Wrench / Spanner
Homemade Seal Driver:
For the seal driver, you may wish to buy one and this will set you back anywhere from £30 – £60 but personally I decided made one. Here it is
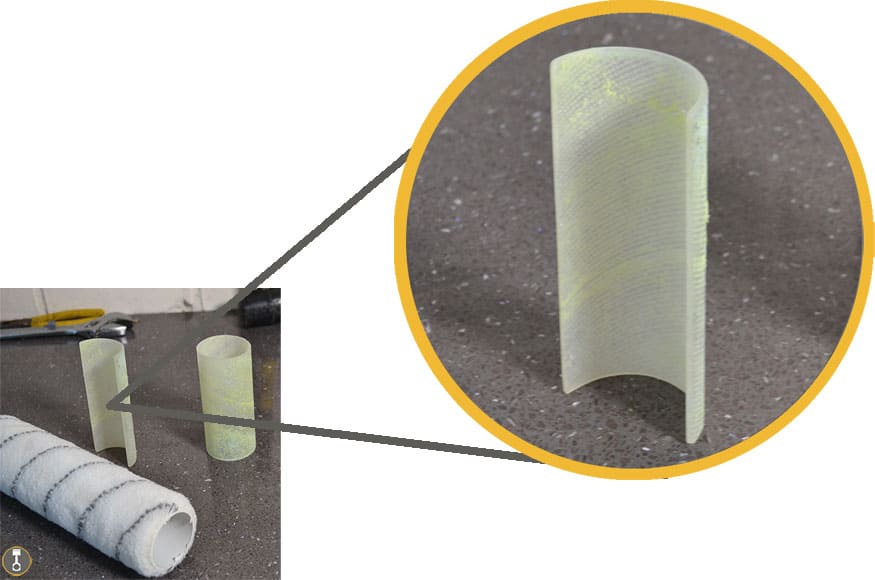
I found that the pipe inside a decorators roller was an ideal diameter for the driver. I stripped the fluff, cut it in half on the width first, then cut in half down the length using a regular saw. Then sanding all edges to make sure they were nice and smooth so not to cause any damage to the seals.
All this was done away from my forks and I made sure I swept and cleaned the mess created because I didnt want plastic shavings and dust getting into my forks. If you dont have a roller then plastic waste pipe would work if you can get the right diameter, even if it means buying new which would still be alot cheaper than a new seal driver.
I’m putting a proper seal driver on my list for the furture but until then, this works fine.
Measuring Out Oil Without A Jug:
Whilst we are talking about homemade things i’ll quickly talk about how I measured out my fork oil.
The only jug in my house is the one my wife uses in the kitchen for cooking and I knew I wouldn’t get away with using that so I came up with this…
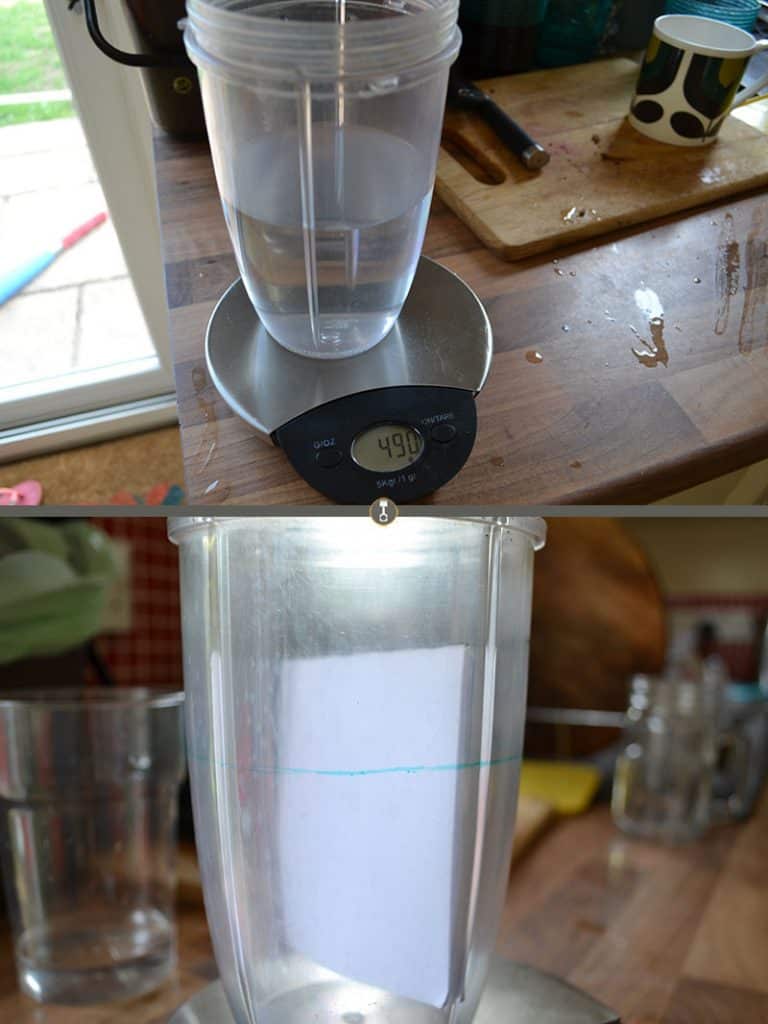
Using a spare vessel, I chucked it on the digital scales and weighed up 490g of water, which is the same as 490ml. I marked the line with a permanent marker all the way around and then emptied the water and dried the jug. This line is now the 490ml line I need for the oil. Drawing the line all the way around gives you a line that will even out any slight errors in level so when you fill with oil you will likely be no more than 1-2 ml out only.
Lay Out The Fork Parts:
- Bottom Allen Bolt
- New Copper Washer
- Oil Cap
- Damper Rod
- Springs and guide washers
- Cap Nut including centre valve
- Upper Fork Tube
- Fork Bushing
- Large Washer
- Oil Seal
- Dust Seal
- Smaller Washer
- Snap Ring
- Bottom Fork
1. Putting Together the Damp Rod:
You may already have this together from before but incase you dont..
You should have the internal rod pulled all the way out and depending on your forks you will have 1 or 2 springs to slide onto the rod. If you have 2 then you will usually have a spring guide washer inbetween, then one on the top . Then you need to replace the cap nut but don’t worry about pinching up at this stage because we will be taking it off again shortly.
Having it on here will prevent the centre rod from dissapearing down into the springs.
2. Slide Damper Through Upper Fork:
Next you are going to insert the assembled damper into the upper fork tube until the end of the damper rod pokes out. Remember the bottom of this fork tube is the end with the bushing on.
3. Add The Oil Cap:
On the end of the damper place the clean oil cap on as it comes out of the end of the upper fork tube.
4. Add The Lower Fork Tube:
Lift the assembled damper and upper fork and slide into the bottom fork tube. Go nice and steady and keep horizontal so the oil cap doesn’t fall off. Push right down until you feel it touch the end of the lower fork tube.
5. Add The Allen Bolt With Copper Washer:
Take the Allen Bolt and slide on the copper washer. You can use a finger to apply a little grease to the thread if you wish.
Position it into the bottom of the fork through the whole without applying to much pressure, you are just trying to feel out the hole in the end of the damper rod with the bolt.
Using a hand on the opposite end where the cap nut is, if you lift a little it will help align the bolt and hole.
When you are ready screw the bolt into the damper rod.
You will likely be able to get it started by hand but as you tighten you might find that the damper rod starts to rotate. If this happens then try compressing the rod into the bottom fork to apply pressure in the hope it will be enough the hold steady the rod from spinning.
Once it bites you should be fine to tighten with the 10mm allen bolt T bar. There will be a torque setting for this bolt in your manual but as I dont have a torque wrench I just try and be sensible as to not over tighten.
6. Washers and Seals:
So the lower and upper forks are now together with the damper securely in place.
Next you want to have the fork upright to put the washers and seals on. For me this was a case of resting it on my bike stand and keeping hold of it with one hand at all times.
If you have a bench vice then put it to use!
Slide the upper fork tube down to expose the springs and take off the cap nut. You won’t and shouldn’t try putting the washers and seals over this nut.
Now slide the upper fork tube up and the damper will slide down into the tube. We will retrieve this later.
Now take the bushing and slide over the fork and guide down as it drops into the bottom fork tube. With all of these components you want to be super careful when sliding onto the fork. You want to avoid scratching or tearing at all costs.
If you are struggling to get on without force then try chucking a clean plastic sandwich bag over he end of the fork for protection.
Next add the bigger of the 2 washers.
Now the Oil seal goes on, and this is a good idea to add a thin layer of grease around the inner rim.
Use The Seal Driver
With the oil seal on get out your seal driver and rubber mallet. Placing the driver on the edge of the seal, take the mallet and strike the seal driver to force the seal down.
It will take a reasonable amount of force from the mallet but start softly and build up. If its your first go then it is hard to guage when its in the right place and you wont know until you go to add the snap ring but dont worry to much.
Now add the dust seal in the same way, again adding grease and then using the seal driver.
Add your top, smaller washer and at this point if you have driven the seals down enough you should be able to see the groove the snap ring sits in located above the last washer.
If you cant then you need to remove the last washer and drive down the seals together. Retry the washer and repeat until you can see the snap ring groove all the way around.
Slide on the snp ring and push into place. You may need you small flat head screw driver or pic to snap in the last part, be very careful not to damage the seals with the screw driver.
7. Introducing The Oil:
Using your prefered method, measure out the correct amount of oil for your fork. In my case 490ml.
You may find using a small funnel benificial for this. You will pour the oil into the top of the upper fork whilst fully extended. I like to have the damper rod up when doing this, so just pull down the upper fork tube, probably remove the spring, grab the rod and pull back up. You can replace the srpings straight away, or after you have added the oil.
Slowly pour half of the oil in and excersie the fork and damper rod to remove any air. You will notice the sound of air bubbles and they will reduce to none.
Once happy the the air has been expelled slowly add the rest of the oil and again gently pump forks.
8. Add The Top Cap Nut:
Nearly finished:
You need to add the nut cap as before but this time piching up. So try to compress the spring whilst holding the centre rod to expose the nut. Then get a spanner on it, or I like to use my adjustable wrench because you can let go of the spring and the wrench will stay clamped on to the nut.
Now start screwing on the cap nut and finally put a spanner or 22mm socket on the top to pinch up.
When happy, remove the clamped nut and pull the upper fork tube fully up to be able to crew the cap into the top of the fork.
Now there should just be one more thing to do…..
9. Add The Fork Gaitors:
Apply a small amount of grease on the inside of the bottom of the gaitor to help it slide over the bottom fork tube after you have slid it down from the top.
It should sit in a groove, then you can add you gaitor clips or for me I followed tradition and used a couple of cable ties. One at the top and one at the bottom.
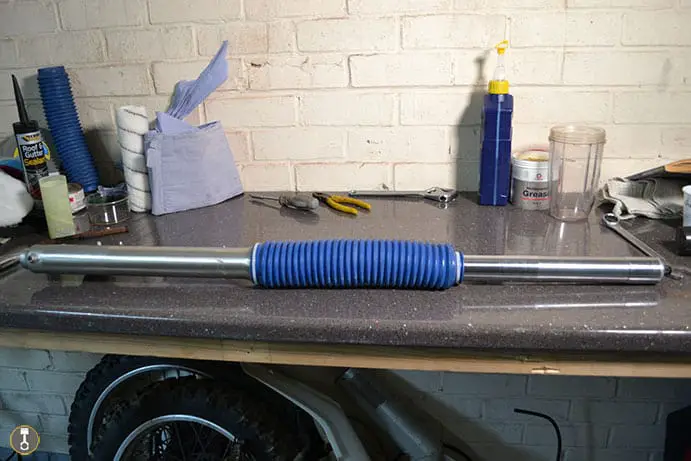

There you have it that is how I rebuild a dirt bike fork. I hope you have found my post useful.
These forks came from my Honda XR 250 and it is part of a complete project I am doing. If you find yourself wanting to check out more about how the bike is doing and various stages I have gone through then head over to the XR project page. You will also find a link there to the expenses breakdown and my youtube channel.
Thanks for stopping by.