I have bought a few used dirt bikes up until now and I have experienced the full spectrum of satisfaction, from absolute bargains to complete clangers, but if I am honest it has mainly been luck that provided the results.
With limited knowledge about what to look out for when buying used dirt bikes you need some sort of guide, so I decided to compile this post with its handy corresponding checklist (available free at the bottom) to help reduce the risk of buying another problem.
Hopefully you too will find this a useful resource and help you avoid buying a lemon.
What To Expect In This Post
It’s not just about the moment of sale, there is plenty to do prior to buying a used bike. In this post I will cover the journey from the start, and will talk about the following:
- Your Budget
- Finding a suitable bike
- Researching further on the make and model in question
- How much should you be paying?
- Contacting the seller – questions and viewing
- Visual bike checks
- Physical checks
- Test ride checks
- Making an offer
Your Budget For The Bike
This is pretty straight forward as you will likely know how much you have to spend, or at the very least a ball park figure. Perhaps the real question is how much do you need to spend? and we shall look at that in a moment.
The only point I really have to make about your budget for buying a used dirt bike, is to work out if the amount you have to spend will satisfy the criteria of the bike that budget can afford to buy.
In short .. dont expect to buy a ferrari on the budget of a mini. If you do find one within this budget then you will only be comprimising on something else and that is usually quality and condition.
As the well known saying goes, ‘if it sounds to good to be true then it probably is’.
Finding A Suitable Used Dirt Bike
This section is going to raise a few questions.
How big, in terms of engine size, do you want?
Have you got some good riding experience behind you or are you just starting out?
If you are a beginner then you will likely be best suited to a lower powered bike, like a 250cc. This will be lighter and easier to handle compared to a say a 650cc.
What are you using the bike for?
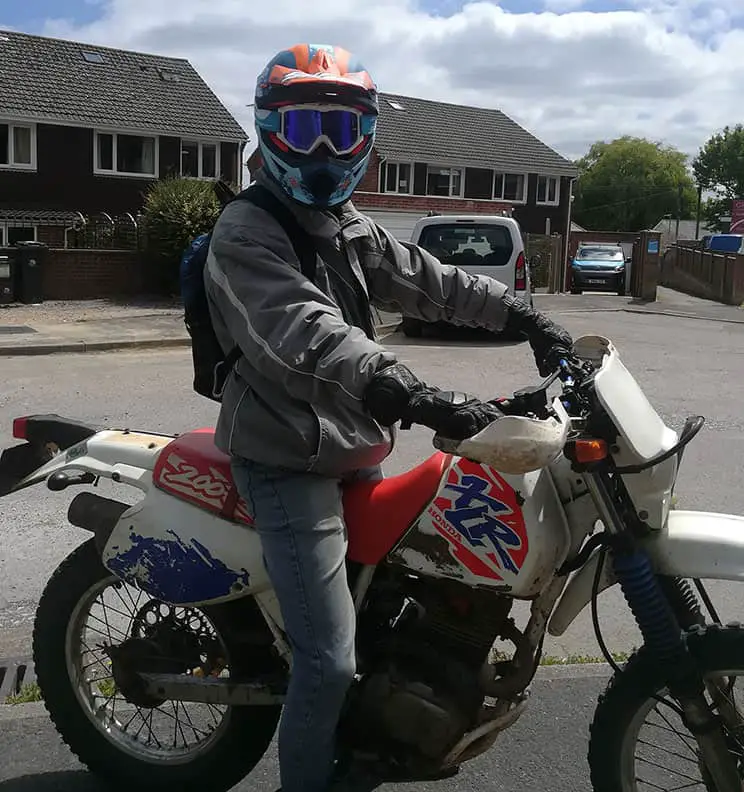
Track, trail or maybe on the road. This could dictate the bike you want to get as different models will be better suited to different situations. I have a Honda XR250 that I like to ride to work which is on the road, then I have a Honda XLR 200 which is setup for riding trails but is also road legal.
I don’t race but will happily take the XR250 to a MX track for a day out. Although most bikes can be changed about to suit varied enviroments, such as changing the tyres, increasing the fuel tank capacity for longer road journeys etc.
(FYI – I wrote an article about the best way to carry more fuel on a dirt bike)
Be aware when looking at a bike to see what you will need to change in order for the bike to fit into your style and requirements. This will translate into a cost and it may not be worth it compared to a dirt bike that is already setup for your needs but might cost a little more.
Dirt Bike Manufacturer
When hunting for a used dirt bike you will come across plenty of brands which will each manufacture different models and produce varying specs for different years.
Personally I am a Honda fan and I regularly look out for used XR’s and XLR’s. That is just my preference although I would consider others like the Suzuki DR if a local one is being sold and I consider it a bargain. I’m keen on the older models from the early 90’s, especially kick start only type.
I guess you get comfy with what you know, but if you have not yet owned a dirt bike then you are starting from scratch, so I would say make sure you opt for a known manufacturer over one you have never heard of. Avoid chinese knock offs that are cheap.
Going down this route will ensure that parts are available, even for older/ classic models and the quality of the build is going to be a good standard.
If you ever get stuck looking for parts then check out my Ultimate parts guide, originally written for XR parts but the methods are good for finding parts for all bikes.
Researching The Make and Model
Once you have a bike or two in mind then doing some further research on that particular model will be time well spent.
Also down the line when it comes to finding a bike for sale and you know the year of the bike from the sales description, you can double check to see if the model and specific year has any known faults to look out for.
Using the Honda XR as an example I can tell you that the engines are known to be indestructible in general, but this does rely on the user looking after the oil by changing it regularly.
Knowing this I always ask the seller what the maintenance schedule is, when they last changed the oil and then check the oil level and colour to see if I think thet are telling the truth.
Other then this the swing arm bolt is known to lock itself in place so I check to see I can turn this before buying the bike. If I can’t then it will be a massive headache to get it sorted and that would equate to spending more cash. My offer would reflect this if I still wanted the bike.
Using Google is the best way of hunting for known problems and issues for various makes and models, as are Facebook groups. Joining groups specific to a model and using the search function, or just ask the members can be quick and easy.
How Much Should You Pay For A Used Dirt Bike?
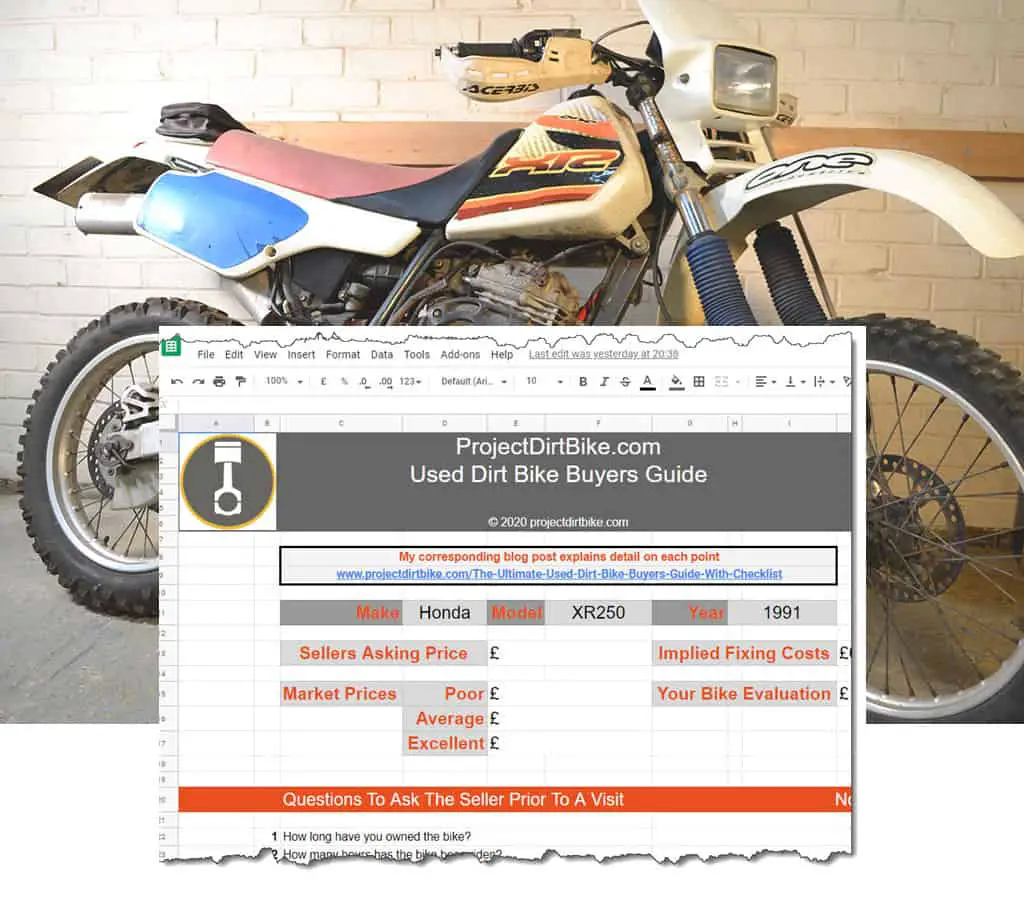
Armed with your make and model you have enough info to get a realistic price for a used bike in varying conditions. This will equip you with the pricing knowledge to be able make an educated evaluation and subsequent offer after you have found a bike and assesed it using my checksheet (find it at the bottom of the post).
By far the best tool on the web for pricing just about anything these days has to be eBay. Not only is it free to use in this way, but the amount of data they have is going to outway any other comparative method in my opinion.
Because there are so may items being sold on eBay all of the time there is a ton of data we can take advantage of.
Using it to search for completed listings that have sold is a great start, then narrowing it down to location if you want to dig deeper.
Start from the eBay homepage and type in the bike you are interested in and hit enter. The more refined the search the better the info so if you know the year you want add it in.
The results will come up for the current listings, which you can quickly sort to show the ‘ending soonest’ results at the top. This will give you a small indicator of the ball park figures of the listings that haven’t yet finished.
These figures can be taken with a pinch of salt because last minute bidding could easily double the price you are looking at. It will serve you well as a minium pricing indicator though.
To show what bikes have actually sold for, scroll down on the left column next to the listing results and you will find a check box labelled ‘completed items’. Ticking that box and without hitting enter the page reloads to show the sold items.
Any prices listed in green mean they sold at that price. Red prices mean they didn’t sell, so the seller may have put a Buy It Now price and nobody took it, or a reserve didn’t get hit on a auction style listing so the item doesn’t sell.
They normally show up to 90 days worth of sales, so these prices are what I call current. This is important to note because prices may fluctuate throughout the year as the riding season kicks in and out, changing the level of demand and subsequently the price.
I don’t know of a decent way to get used dirt bike prices that are more than 90 days other than researching and logging it yourself in a spreadsheet. If you do then feel free to chime in with a comment at the bottom of the page and i’ll add it to this article.
Now you have the sold results, open a few listings and read what condition the bike was is in and make a note of the price it sold for.
Doing this for as many listings as possible will mean you can start to build a picture of the prices for different bikes in a range of conditions.
You can choose to refine the search by playing with filters in the left hand column above and below the ‘completed listings’ check box.
They also have a filter for location where you can chose a location and radius around it which will help view local info.
I dont feel this step is really necessary because you will find people are happy to travel when it comes to bikes. Others may like it though and it will be good if you only want to buy local.
Finally when looking at these results check the listing info to see if the bike was sold by a private seller or a dealer. Dealers will likely set a start price or only have a Buy It Now option to ensure they make their money.
Dealer prices are often higher then private prices because they tend to offer warranties and returns whilst giving the seller peace of mind that they are a trusted place to purchase from.
Other than eBay , you can phone local dealers to get trade prices on a bike you are interested in and other people recommend using various websites to find such info.
Personally I don’t see this as worthwhile because a bike is only worth what someone is willing to pay for it, and eBay tells us what these sold figures are.
Once you have found possible dirt bikes you next want to contact the seller.
It doesn’t matter if the advert was from eBay, Craiglist or your local store, it is always best to contact the seller by phone.
If there are no contact details or they are trying to avoid a phone chat then forget it. You want someone who is willing to talk about the bike prior to you arranging a viewing because this gives you the opportunity to ask questions and work out if it is worth pursuing.
Many dirt bikes are found using eBay, if the listing doesn’t state a contact number then hit the ‘contact seller’ button and ask for it.
Questions To Ask When Buying A Used Dirt Bike
Some of these questions you will repeat if you decide to move forward and meet the seller for a viewing, so make note of responses on the checksheet (download at the bottom of the post) which you will take with you. You can then double check.
In no particluar order I ask:
- How Long Have You Owned The Bike?
- How Many Hours Has The Bike Been Riden?
- Why Are You Selling The Bike?
- How Often Do You Change The Oil?
- When Is The Last Time The Bike Had Any Major Maintenance?
- Have You Got The Log Book (known as a Title for US readers) and is it in your name?
- If I Come & See The Bike Is It Ok To Carry Out A Couple Of Small Tests?
- Can You Tell Me The VIN Number or Photo & Send It Over?
- Are You Negotiable On Price?
- When Is A Good Time To Come And Take A Look?
These questions should all be easily answered but it is important not to sound like a robot when asking them. One of the main things is to build a rapport with the seller, have a little bit of small talk in between these and let the conversation flow.
You don’t want to intimidate the seller and put him off selling to you. Equally having small talk will mean you get the chance to work out if this guy sounds trustworthy with his answers.
Lets breeze over these questions in a little more detail.
- How long have you had the bike?
This will be expected by the seller. It is always nice if the seller has owned the bike for a long while, indicating it is likely a genuine reason for sale, he would of had to maintain the bike and he hasn’t just bought it to flip and make a quick buck.
Buying from a bike flipper isn’t necessarily a bad thing but they are always looking for a quick profit and wont know the bikes character or issues. They will also be unable to tell you about the maintenance schedule because they haven’t owned the bike long enough to have one.
If they are a flipper then be more focused on the bike inspection if you decide to go that far.
2. How Many Hours Has The Bike Been Riden?
It’s common to see digital displays showing the riders hours for the bike and if they have had the bike for some time they will have that evidence.
It’s nice to see they have had some hours on the bike, again to avoid a flipper but also because they should know more about the maintenance routine/schedule. Mainly the oil change.
3. Why Are You Selling The Bike?
This is an easy question to make up an answer for so you want to take the answer in context with the rapport you have been building up. If the answer isn’t very in depth like ‘I need some cash’ or ‘I am bored with it’ then this doesn’t sound great.
If they say I am looking to create cash because i’m off to uni and in prior conversation you have established they just been away looking at accommodation in another town close to a uni then the answer has some credability.
If they are appear a little nervous here are they selling a problem?
4. How Often Do You Change The Oil?
This is a good question because even the newset of dirt bike owners knows they need to do an oil change regularly.
Hopefully they will tell you they change it every x amount of miles, or riding hours.
5. When Was The Last Time The Bike Had Any Major Maintenance?
If they have owned the bike for some time then you are going to expect more replacements for standard items. These are like tyres, brake pads and maybe wheel bearings etc.
They may not be happy to get their hands dirty so maybe a garage has carried out the work but you would expect them to be able to say….’the wheel bearings are due’ or ‘the sprockets and chain have just been done’.
Ask if they have any paperwork for these and if they say no because they done them, then ask for part receipts.
Major maintenance doesn’t mean the bike had problems. Items like tyres and brake pads will need doing sooner or later because they wear and if they need doing that is fine, you will just make this as part of your pricing calculation if their asking price seems ait on the high side.
6. Have You Got The Log Book (known as a Title for US readers) and is it in your name?
Here is the UK we have a log book for road registered bikes, and I believe in the USA you have a title. I am not sure if that is for all bikes or just road registered bikes but you should know if you live in the USA.
If they are meant to have one then double check they have it and that it is in their name before viewing the bike. This could save a journey if the don’t.
7. If I Come & See The Bike, Is It Ok To Carry Out A Couple Of Small Tests?
If the seller is an honest one then they shouldn’t have any problem with you having a little poke around the bike, both visually and physically.
If they are hesitant then you can simply tell them that you like to check a couple of key items to establish overall condition and potential future costs and you wont be able to proceed otherwise.
Should the seller still be cagey then this could be sign to move on and forget it.
8.Can You Tell Me The VIN Number or Photo & Send It Over?
Having this prior to a visit will give you a chance to check if the bike is stolen.
This is not really preferable to do onsite because you will be relying on a mobile data signal so you can check the web, and it’s kinda awkward to do infront of the seller.
Read this post – How To Tell If A Dirt Bike Is Stolen ,for more on using VIN numbers to check if a dirt bike is stolen.
9. Are You Negotiable On Price?
If they have stated a price rather then the dirt bike being an eBay auction then ask them if that is set in stone.
What you are trying to work out is, if you view the bike and like it but you can see that it is going to cost money putting things right, then would the seller be willing to compensate a little on price.
For example you might point out the sprockets and chain are well past it and will cost you £60 before you can ride it when he states the bike is good to go.
If they stated it in the listing then fair enough, you will have to decide if you are willing to pay the asking price if they won’t budge.
10. When Is A Good Time To Come And Take A Look?
All being well it is time to arrange a viewing. Nothing to say about this step other than be sensible about the time of day and location. It is also worth taking an accomplice so you have reassurance that someone else is there should things get odd, and secondly to keep you on a level when viewing the bike.
We all know that it gets exciting and sometimes it is easy to just say ‘yes I want to buy it’ no matter what the condition turns out to be.
When viewing the bike we break it down into a few different stages to simplify the process and make things systematic.
- Questions for the seller in person
- Visual checks
- Practical checks
- Test ride checks
Throughout these steps we are primarily trying to establish if the bike is worth buying. Don’t be affraid to walk away if it is not, that is whole point in having a systematic approach.
Secondly we are making notes, (mentally and physically) about anything we think we should be taking into account when making our offer later on.
Questions For Seller In Person
These are questions you ask when you are viewing the bike, some will simply be repeated from the phone questions, but now you can read his reactions and response as well as double checking from any previously given answers.
It’s not intended to try and catch people out but more about determining the level of trust you should be giving this seller.
Other questions will just be general questions about the bike. Remember you want to convo to flow so don’t just fire a bullet style list at the guy, I like to combine the questions whilst carrying out visual checks.
There are few questions you want to ask but others will just crop up as you are checking over the bike.
An example of the questions I would definitly ask are:
- How long have you owned the bike?
- Do you get out much on it / how much have you riden it?
- How often do you change the oil?
- When was any last major maintenance done?
- Why are you selling?
Examples of other questions maybe things like:
- what has happened to brake lever here – ( assuming you spot a defect)
- Did you change the rear sprocket and not the front – if you see alot of wear on the front but not the back
- Are these original decals do you know – this is a filler question but may lead to the seller telling you something more meaningful, like the tank had a respray for example.
I’m sure you get my point. I try to have a genuine conversation whilst trying to extract the info I need. If they seem abit cagey about anything in particular then dont be afraid to out right ask, or find a related way to ask from another angle.
Visual Checks When Buying A Used Dirt Bike
Now you are at the point of assessing the bike up close. We first check the bike over visually, taking into account not just the cosmetics, but signs of usage and condition.
I have tried to label general maintenance items to indicate the ones that you may expect to find an amount of usage and wear, because they are consumables or similar. Like brake pads for example.
Cosmetics: First up then is a general look at the condition of the bike compared to the sellers description. Did they make a fair admission?
Does if look neglected which may indicate they are not bothered about its up keep.
I always find the surroundings to where the bike is kept interesting. My bikes are kept locked in a clean garage and have a clean blanket over them when they are not in use.
Some people are totally the opposite and leave them caked in mud, outside under a lean-to. They don’t seem to bothered about much.
Oil Leaks: Look around the gaskets, under the bike for any leakages.
Tyres: A general maintenance item, but if they need doing now or in the near future its worth noting if the asking price is on the high side.
Riding Hours: If visible on a meter, how many hours has the bike done. Was this in it’s whole life or since an engine rebuild if applicable.
Swing Arm: Looking for dents, and cracks here. Also look at the chain guard to see if the chain has worn through guard itself.
If it has then it doesnt take long for the chain to start eating through the swing arm and that isnt cheap!
VIN Number: Check to see if the number on the frame matches the documentation. Or you can use this number to do a quick serach online to bring up the bike and details.
Hopefully you had access to this prior to a visit as I mentioned in the earlier steps.
VIN stands for Vehicle Identity Number and is used as an industry standard on all vehicles to identify the make, model, engine size etc.
If the VIN looks tampered with then that is not good and could mean it’s stolen.
On many dirt bike models the VIN can be found stamped into the frame on the head stock. Rotating the handlebars to the side can help make it visible.
Fuel Tap: Is it on good shape, does it look like it is leaking?
Seat: Any rips and tears in the canvas? Colour fading is common on older bikes.
Plastics: These are easily scratched on well used machines and nothing to worry about if the bike is of a mature age. It will be your decision as to the condition they should be in for the age.
Look for cracks and if they are note that down for later.
I wouldn’t expect any cracks unless othewise stated of course and therefore would be looking to drop the price a little to compensate if there are any.
Other Parts: It goes without saying that as you go around the bike if something is plain broken then note it. If you have a concern about something then ask the seller.
If there is nothing alarming in these visual checks then move on to the practical checks next.
Practical Checks When Buying A Used Dirt Bike
Hopefully you asked the question on the phone about it being ok to do some checks on the bike at the time of viewing it.
I always take my bike stand and a few basic tools along with some WD40 just incase.
The seller shouldn’t mind this if he has nothing to hide and equally will realise you are serious about the bike.
Try to be confident in your approach and if you cant locate something just ask them. If they don’t know the answer then ask yourself should they.
Practical Checks:
- Chain Wear
This falls under general maintenance and will need doing at some point so it’s a case of checking to see what life is left in it.
To do this, attempt to pull the chain away from the rear sprocket at the 3 o’clock position.
You shouldn’t be able to pull it enough to see daylight inbetween the sprocket teeth.
If you can then it has worn and a small amount would be acceptable. Definitley no more then one third of the tooth though.
If you can pull it towards the top of the teeth then it is going to need replacing.
- Rear Sprocket Wear
General maintenance item. Take a look at the teeth. The teeth get narrowed and pointed more at the top when they are worn. They will also start to look bent over like the crest of a wave if they are really bad.
- Front Sprocket Wear
General maintenance item. Check the same way as the rear sprocket.
- Linkage
This is advanced maintenance and many people wouldn’t do these. You do want to check them though and it’s relatively easy to work out of they are done for.
I will write a complete post on this and get some pics to illustrate but for now with the bike on the stand check the swing arm moves freely and smoothly up and down.
Check for side to side movement which there shouldn’t be. If there is or the swing arm isn’t moving freely then they are going to need attention and at the least a good grease.
At worst they will need replacing which isn’t my favourite job but not to difficult if you have the tools.
I shall try and remember to come back and link from here when the post is up, if not just use the search box at the top of any page on projectdirtbike.com – type linkage check or similar.
- Forks and Seals
If the fork has gators (fork boots) on then pull them back. Sometimes people cable tie them in place and I ask to snip them off so I can see underneath them, and will replace the cable ties. (something else to take with you)
With the fork gators out the way have a look for oil leaks. You shouldn’t be able to see any oil build up. If so the seals will need doing.
Don’t forget to look inside the gators, in particluar the end closest to the ground. Oil will likely build up, leave residue or stain here.
Have a look at the inner tube of the fork, which could be top or bottom depending if they are upside down forks or not. You are looking for corrosion, pitting and in worst cases rust.
This tube travels down through the seals and will cause leaks if it isn’t completely smooth, so you want a nice shiney smooth inner fork.
- Levers and Cables
Levers I like to see if they are bent and not snapped. Then give them a squeeze.
Follow the cables down from the levers to check for brakes, cracks, wear or anything abnormal.
- Bike Underside Condition
Hopefully the owner wont mind you tipping the bike on its side. A dirt bike is fine resting on it’s side so tilt the handle bars in the opposite direction and carefully lay it down.
Take a good look under the bike. Check for oil leak signs, dents or cracks in the frame and have a good look at everything else visible.
- Chain Guides and Guards
I mentioned the chain guide in the visual but lift the chain and have a good look if you haven’t already.
Check out any chain guards covering the front sprocket, looking for dents or cracks and then the rear end may also have chain guide/guard so check that also.
- Swing Arm Bolt
This is a big one for me. I like the bolt to be able to move and not be seized in. Using a socket and spanner rotate this swing arm bolt. If it’s stiff but moving thats cool, if it is locked in place then this could mean it has welded itself stuck and probably wont be coming out.
A stiff moving one can be taken out, cleaned and regreased. A stuck one cant.
Ask them if they have ever had it out. A keen dirt biker would of likely taken it out and regreased it at some point.
- Radiator Fluid Level
Not all bikes will have a radiator but if it does undo the cap and check for fluid. You should be able to see the fluid level without doing anything.
- Air Filter
General mainenance item:
Checking the air filter condition is a good way of seeing how well they are maintaining the bike. You will find it either under the seat of behind a side plastic so you will need to take one of these off or maybe both.
Look at the air filter to see how dirty it is. If it is filthy and clogged then this is a sign of neglect and this should be an easy thing to maintain for any rider.
Changing or cleaning an air filter goes hand in hand with oil changes. I never do one without the other and a clean is the minimum.
They may of just slapped a new one on for the sale so whatever condition it is in take the air filter out and check behind it to see if there is any dirt, dust and grit that has got past it.
This is another sign they don’t change it as regularly as they should because if they do then the cavity behind the filter will be clean.
You can also feel the filter it to see if they oiled it up like you are meant to.
For reference you can find info on how to do these general things at my Dirt Bike Maintenance Hub. Knowing how to do them will mean you will understand what to look out for.
- Hot Enginge?
Get your hand near the engine or touch it to establish if the engine is cold, warm or hot.
When you view the bike you don’t want to find the engine to be warm or hot which would indicate they have had the bike running prior to your arrival.
They may of done this because it is a bitch to start cold due to issues, and they know that when you come to start it if the bike is warm it should start first or second time.
If it’s warm, ask them if they had the bike runnning before you got there to see what they say.
- Compression:
You can use a compression tester which is a piece of kit that you use by taking out the spark plug then screwing the tool in it’s place. Then you start the bike either by electric start or kick start.
This will cause pressure to build and when the pressure peaks and wont go any higher simply take the reading from the gauge. However not everyone has one of these.
If you don’t have a compression testing tool then on a electric you will struggle, but on a dirt bike with a kick start you can do it by feel when kicking through.
Get yourself into postion ready to kick start the bike, then instead of kicking, push through the kick starter a couple of times and if the bike has compression then the kick starter should become stiffer and more difficult with a few pushes.
You wont know what the reading is but you will know the dirt bike has compression because the pressure is building and it becomes stiffer to kick.
If the kick starter is very easy to push through without any resistance building there could be a problem.
- Head Stock Bearings:
These are found in the steering stem and are sandwiched between the bikes front forks and the handle bars inside the head stock.
Moving the handle bars from side to side should be free and easy. If the bearings are starting to go then it may feel gritty and not smooth.
Replacing these can cost a few quid if done by a mechanic but they are not the most difficult thing to do yourself.
You can check out a couple of my posts from when I rebuilt my Honda XR250 to see the process.
First one here is the bearings on the stem: https://www.projectdirtbike.com/xr-triple-clamp-over-haul-bearings-and-seals/
and here is when I replaced the bearing races into the frame:https://www.projectdirtbike.com/installing-steering-head-bearing-races-and-triple-clamp/
- Thottle Returning:
Easy to check, just twist the throttle all the way back then release to find the throttle return to it’s start position.
The throttle shouldn’t be slow to return and with out sticking, so a nice snap back to the start.
Not to bad to fix, it could be a the cable or the throttle assy in the carb. There will be a post on this in the maintenance hub when I get round to it.
- Electrics – Lights, Indicators, Brake Lights and Horn:
Go through each instrument to see if they work. Faults could simply be bulbs or bad wiring.
If you can’t find any obvious signs then you could be in for a fault finding exercise. Make a note and include a deduction in the offer if needed.
- Spokes :
Look at the front and back wheels to see if there are any missing spokes. You should also check to see if the spokes are loose.
Do this by pinching 2 spokes together to check for movement for which there shouldn’t be any. Work your way around the wheel and then do the other wheel.
Look at the general condition like rust or bends. Also check the spoke nuts for rust and corrosion
- Wheels:
With the dirt bike up on a stand you should be able to roll the front and back wheels.
Look to see the wheels move ok and that the brakes are not binding. Then eye ball the wheel in rotation to see if it is buckled or running true.
Hopefully you looked for cracks in the rim when doing the visuals, but if not check for these as well at the same time.
- Frame:
I like to stand at the back of the bike and get my eye level down to the rear fender so I can see straight down the bike and look for it to appear straight.
Go back to the front and follow the frame on each side to check for condition and feel free to remove any side panels that may be hiding anything.
- Rear Shock:
This is similar to the front forks in a way. You have a center rod that gets compressed into the bottom half and when doing so passes the seals.
This rod should be free of corrosion, pitting and rust, other wise it will damage the seals. Sometimes if there is some at the very end it wouldn’t effect the seals so you can get away with it.
Look and feel around the whole shock to check for leakage and look at the spring for cracks or poor condition.
Rear shocks will cost a few hundred to get rebuilt or you could replace for new but that will likely cost more.
I had one rebuilt for the XR which cost me £300 and I wrote and short post which is good for showing pics of the parts I am talking about. Find that post here
- Brake Pads:
General maintenance item:
Most riders would replace these themselves, it’s easy once you have done it once.
Check the front and rear pads for wear, looking at where the disc runs between them and you will see how much is left. If they are close then it could be a good haggle point of the asking price is high.
It is not an area of concern as you will be changing them at some point for sure.
- Brake Discs :
Brake discs will also need replacing from time to time and although not general maintenance they are a common item to replace longer term. If they have had the bike for any decent amount of time then I would expect they have experience of this.
Check the disc for cracks and overall condition then check to see if the disc is grooved.
Do this by using a thumb on the most inner part of the disc nearest the hub and running it out to the edge, feeling and looking for grooves and ridges.
There shouldn’t be any and will need replacing if there is.
Take The Bike For A Test Ride
If you are satisfied that the bike is still a contender then it’s time to take here for a test ride.
Needless to say but… if the bike came accross dangerous during the visual and physical checks then think twice before test riding what could be a death trap.
Assuming you are riding it anyway then start it up.
As previously mentioned the engine should be in a cold state so you can witness to true starting capabilities and any issues that may stand out.
Before hitting the gas look at the exhuast for excessive smoke, maybe a nasty black colour and if it is persistant or not. This could be a few different things and a main worry of its constant.
When test riding you want to use the time to check the bikes functions. That is to go up and down through all gears both in a steady manor and then also under abit more throttle, like you have the police behind you!
This will raise any gearing issues.
Then do the same for the brakes, first at a steady pace then at more speed. As well as the stopping function be aware of the lever and foot brake to see if they are responsive or spongey.
All the time be listening for strange sounds throughout transitions and functions of the bike.
Be sure to try and steer left and right and at close to full lock if you can to test the full range of steering.
Visually check any instruments like the speedo, dash lights for indicators and lights etc which are always worth checking when the bike is moving as well as standing.
I prefer to do a test ride for a full 5 mins +, after the above checks to try and weed out anything else. Then when I return, switch off the bike then restart it as a double check.
Overall Assessment Of The Dirt Bikes Results
It is now time to bring everything together from what you have assessed and try to establish an educated figure based on the bikes condition against what the seller is asking for it.
First and foremost how do you feel about the bike and the way it rides? If you haven’t fallen for the bike based on emotions then is it right for you regarless of the price?
Next, using the checksheet I have provided should be a good aid for you at this point.
You should know the market value for the condition they described the bike, by researching before you turned up. Then armed with your assessment results you can look to equate any deductions if required, to try and put your price on the bike and see how that compares with theirs.
If you feel it’s worth making an offer then do it.
Making The Offer
You have in your mind what you think the bike is worth and you know what they are asking.
Sometimes this can be pretty level, on rare ocassions you may feel you have a bargain before any offer is made. But more likely than not you will feel you want to offer less than the asking price.
Human nature means the seller will usually price higher due to emotional attachments and they expect people to chop a bit off just for the hell of it if nothing else, so it is your job to haggle the difference.
First I usaully thank them for their time, letting you ride the bike as well as running your checks.
Then I let them know I am very interested, but am perhaps not comfortable with the price and ask them if they are willing to talk about it. Hopefully you know they are negotiable from prvious questions.
Pulling cash out at this point so they can see it will help your cause, then say to them ‘I have cash’ which will move the deal along as they can see you are serious. This reconfirms their visual cues.
Depending on how deep you want to get into a sales stratgey, you can do a couple of things before making an offer.
- Flatter them and stroke their ego.
This maybe saying something like …’ I can see you have really looked after the bike’ or ‘ you have done a great job with the bike’.
Obviously it needs to be inline with the bikes condition. No point in saying that if you are both staring at a pile of junk.
If you don’t know what to say just skip this step. No point in looking like a fool.
2. Point out your issues and the costs that will be incurred.
This is your evidence collected from your assessment that money needs to be spent on the bike to get it to the level of condition you would expect for the price, and that you would be happy to negotiate this off the asking price.
Literally list and point out your findings. Walking around the bike whilst doing so to explain your reasons.
Then drop in your offer.
‘I was thinking £???? would be fair’
Don’t leave the offer as a question, but a closed statement, and then wait for their reply with silence. If you say ‘can you come down to £????’ it is very easy for them just to say NO, then it’s your turn to speak again and you will likely feel pressured to raise your price.
Allow them to respond from your statement price and go from there. If the seller likes you, which they will from the rapport you built at the beginning, your politeness and the respect for your professionalism when checking the bike then they will likey feel at ease to negotiate and work with you.
Just remember to be fair with your offer. You are not looking to cheat them out of money, you are looking to protect your pocket by not getting ripped off by giving an honest offer based on your findings.
I really hope this post has been helpful, don’t forget my free check sheet below, and there is a quick video explain it’s usage.
Any questions then drop a comment at the bottom of the page.
Good Luck.
Get Your Free – Used Dirt Bike Buyers Check Sheet
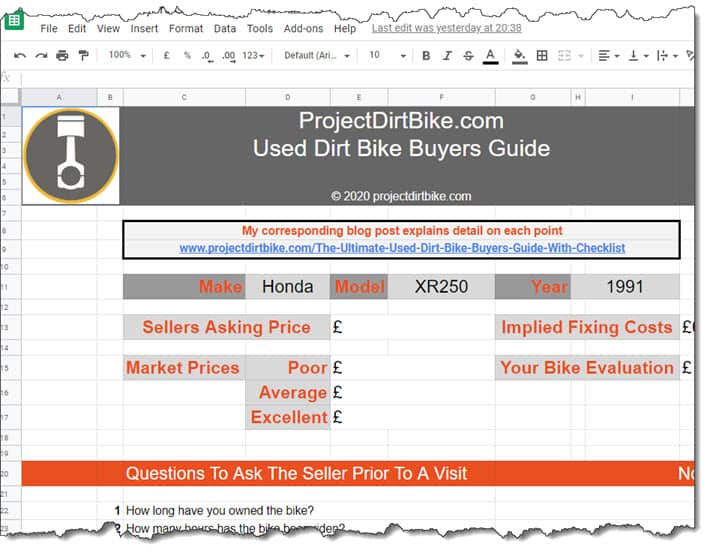
If you haven’t yet downloaded the buyers checksheet then get it using one of the options below. It wont cost you a bean and will be a good tool for helping you purchase your next used dirt bike.
This check sheet is created in Google sheets and one link will enable you to save a blank copy of the sheet to your Google drive. If you don’t have a google account then you will need to set one up which is free.
The second link will enable you to download it as an excel file so you can use it in Microsoft office for example. However I can’t guarantee the formatting will be the same. Also view the relevant video (video 2) for downloading instructions.
Video 1 – How to add a blank copy to your Google drive. Google account or required (or create one, it’s free.)
Make a copy – LINK HERE
Video 2 – For people how want to download a copy to use outside of Google sheets.
Download copy – LINK HERE
